Blizzard did a really nice job transforming these systems into unique, interesting, and (for real fans of the game) sentimental collector pieces. As an avid gamer myself having spent many, many, many hours roaming around on the Vek'nilash realm with friends...when a box arrived one day from a very close friend (also an avid fan) that contained one of the Vek'nilash blades, to say I was pleased (and to say he's a good friend) is an understatement.
Of course, it wasn't long after I had opened the box and was marveling at it on our kitchen counter that my wife asked what I planned to do with it. Indeed, what to do? After browsing around I noted some folks had built or purchased display stands (or cases), but I knew even if I found the space for that, it would never survive my kids. So I decided to wall mount it. My friend suggested I take some pictures, and describe the approach I used in the hope it would be useful for others wanting to do something similar.
 |
| My wall, Your destiny |
I wanted to find a way to do this that would be safe and secure, relatively easy to do, and not require altering anything on the blade. After looking around at Michaels (craft/hobby store) one Sunday, I decided I would buy and try to use this French Cleat system (also used for wall mounting heavy art, frames, etc):
 |
| French Cleat wall mount kit (~ $15) |
It claims to support things weighing up to 200 lbs. Given the blade weighs only around 20lbs, this was more than sufficient. The bag had two pieces, one needing to be mounted to the back of the blade itself, and then other mounted on the wall.
 |
| Wall mount piece (top) Blade mount piece (bottom) |
With both mounted, the wall piece forms a rail over which the blade side hooks over...and the two fit together snugly like puzzle pieces. Mounting the piece needing to go on the wall was the easy part, which I did last. The more challenging bit was mounting the cleat to the back of the server blade. Here's the procedure I used. Looking at the back of the blade, there's a number of holes...
 |
| Back of Server Blade |
...but only some of them threaded (3 on the top, and 3 on the bottom). Conveniently, those threaded holes accept standard PC case screws. I'd be willing to bet that if you're reading this to figure out how to mount your WoW blade, you probably have a baggy packed with these screws laying around somewhere. Just a guess.
 |
| Standard PC case screws! How convenient. |
As the cleat really needs to be mounted near the top so that most of the weight is hanging below it, I decided I would use these holes (white arrows). There's 3 of them, and I went with the outer two:
 |
| Threaded screw holes used for cleat |
It would be too easy if the screw holes on the cleat aligned perfectly with these two on the case, but they don't. Once you align with the hole on the left, it becomes evident you're going to need to drill a hole in the cleat to be able to use the case hole on the right.
 |
| Screw holes don't align with the pre-existing holes on the cleat |
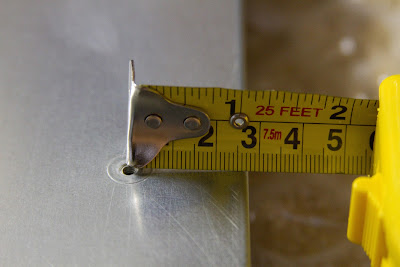
Also, important to note is that these two holes aren't the same distance from the edge of the case:
 |
| Left hole: 3cm from edge |
 |
| Right hole: ~ 2.75cm from edge |
So if you assume they are, and drill a hole on the same line as the others on the cleat, the blade will hang slightly crooked. So to avoid this, you'll need to drill your hole ~ 0.25cm higher than the already existing line of holes.
Position the cleat on the blade. Align the hole on the left, and then slightly shift the cleat up until you can see where the hole on the right is. Mark that line with a pencil or something and then mark the center of the new hole ~0.25cm higher than the other holes. Basically, the center of the new hole will be parallel with the top of the other holes.
 |
| Mark the position of the new hole |
With that, after aligning the hole on the left...the hole on the right should be perfectly aligned, and the cleat should be level with respect to the top of the case.
Use two case screws to affix the cleat to the case.
 |
| Mission Accomplished (at least in a George Bush sort of way) ;) |
The blade is done at this point. Next we just need to mount the other rail piece to the wall where the blade will live (I suggest as prominent a location as your significant other will let you get away with).
The kit comes with some meaty screws for mounting into the drywall, along with a little bubble level. As I wanted more than just drywall support, I ended up using a stud finder to locate a couple of studs into which I also drove some other random screws for additional strength.
 |
| "Rail" piece wall mounted. Ensure it's level and not upside down! |


